I find kettle grills to be the most versatile model of outdoor grill. They’re easily the most popular on the market, and for good reason.
But one thing they usually lack – other than on premium models – is a dedicated work surface. Having somewhere to prepare food before grilling is a massive bonus.
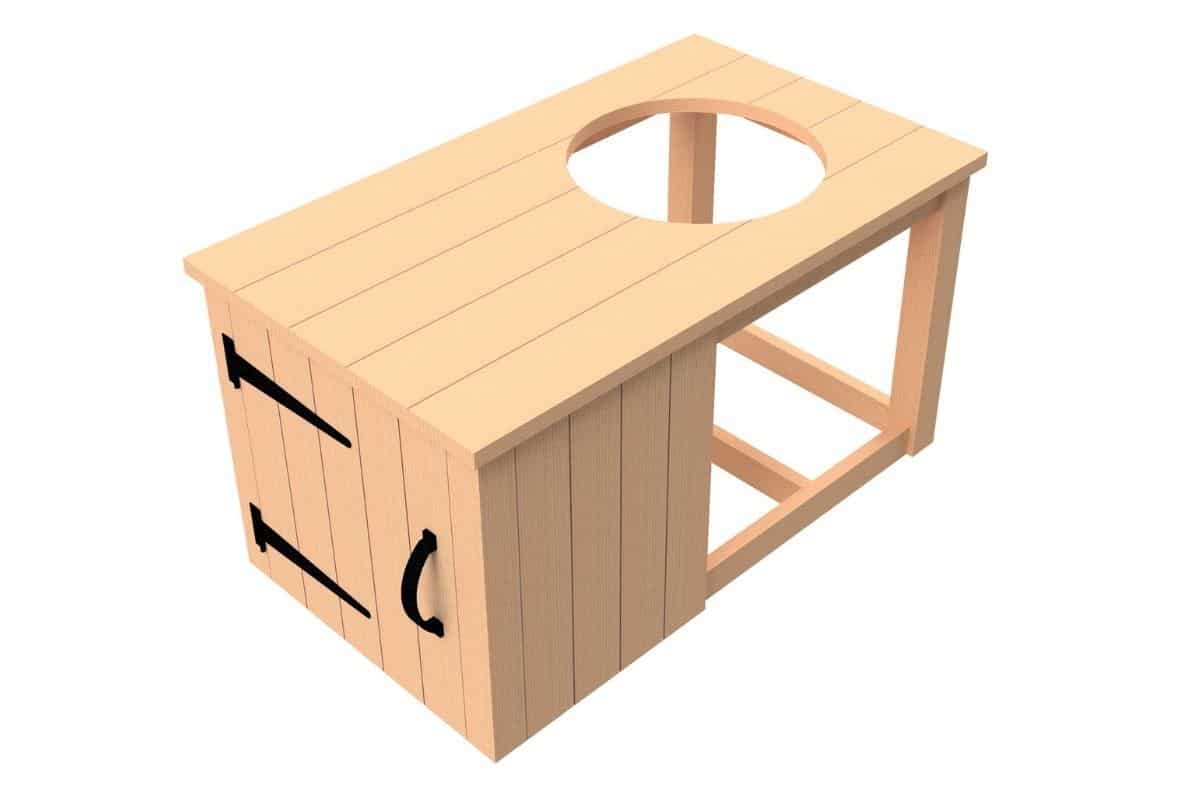
Upgrade your simple kettle grill with these free kettle grill cart plans. Not only does the cart provide a food preparation area, there’s plenty of storage included too.
In this guide I’ll take you through all the equipment and steps for building a 22” kettle grill cart. We’ll cover material selection, necessary tools, and detailed instructions. Hopefully by the end you’ll be ready to get stuck in to this project!
Before we begin, a huge thank you to Nathan over at tooltoaction.com who granted me permission to use the blueprints, images and more from his original kettle grill cart plans for this guide.
Equipment and Materials
For this grill cart you won’t need any specialist tools or materials. Provided you’ve got standard cutting and drilling equipment at home it shouldn’t take you too long to put this together.
Materials
Choosing the right kind of wood for outdoor use is vital. While you could choose anything, it makes sense to go with something hardwearing and moisture resistant.
Sure, you could stain or treat the wood, but I’d recommend not doing this for food safety reasons. Stain isn’t particularly dangerous, but it’s not really worth the risk.
To get the most from your 22” kettle grill cart, use cedar at the very least. There are plenty of other woods to choose from, including redwood, cypress, or teak. Along with lifespan, consider color too if this is important.
The measurements below include a 10% allowance for waste. Consider adjusting this figure depending on the cost and quality of your chosen lumber.
Also, bear in mind that the dimensions given of dimensional lumber are usually less than stated. For example, 2”x4” will measure 1.5”x3.5”, and so on. I recommend measuring the specific lumber you’re using and adjusting the dimensions given in the plans.
In order to illustrate this, I’ve included the measurements of my chosen lumber in brackets below.
Lumber
- 2”x4” (1.5”x3.5”) pressure treated lumber – total: 42’ 6” or 1 off 6’, 1 off 8’, and 3 off 10’ lengths.
- 2”x2” (1.5”x1.5”) pressure treated lumber – total: 3’ 10” or 1 off 6’ length.
- 4”x4” (3.5”x3.5”) pressure treated lumber – total: 11’ 9” or 1 off 12’ length.
- 1”x6” (0.75”x5.5”) pressure treated lumber – total: 18’ or 7 off 12’ lengths.
- 2”x8” (1.5”x7.25”) pressure treated lumber – total: 28’ 5” or 3 off 12’ lengths.
Additional Equipment
- 2 off 16” shed hinges
- Shed door handle
- 4 of 3” caster wheels
- Kettle table mount brackets
Fasteners
- Box of 1.5” timber screws
- Box of 2.5” timber screws
- (Optional) pack of 1.5” long finishing nails compatible with your finishing nailer
Tools
- Power saw: Either a circular saw, miter saw or table saw
- Jigsaw
- Drill and drill bits
- Impact driver and driver bits
- Corner clamps
- Pocket hole jig and drill bits
- Finishing nailer (optional)
- Sandpaper
Assembly Instructions
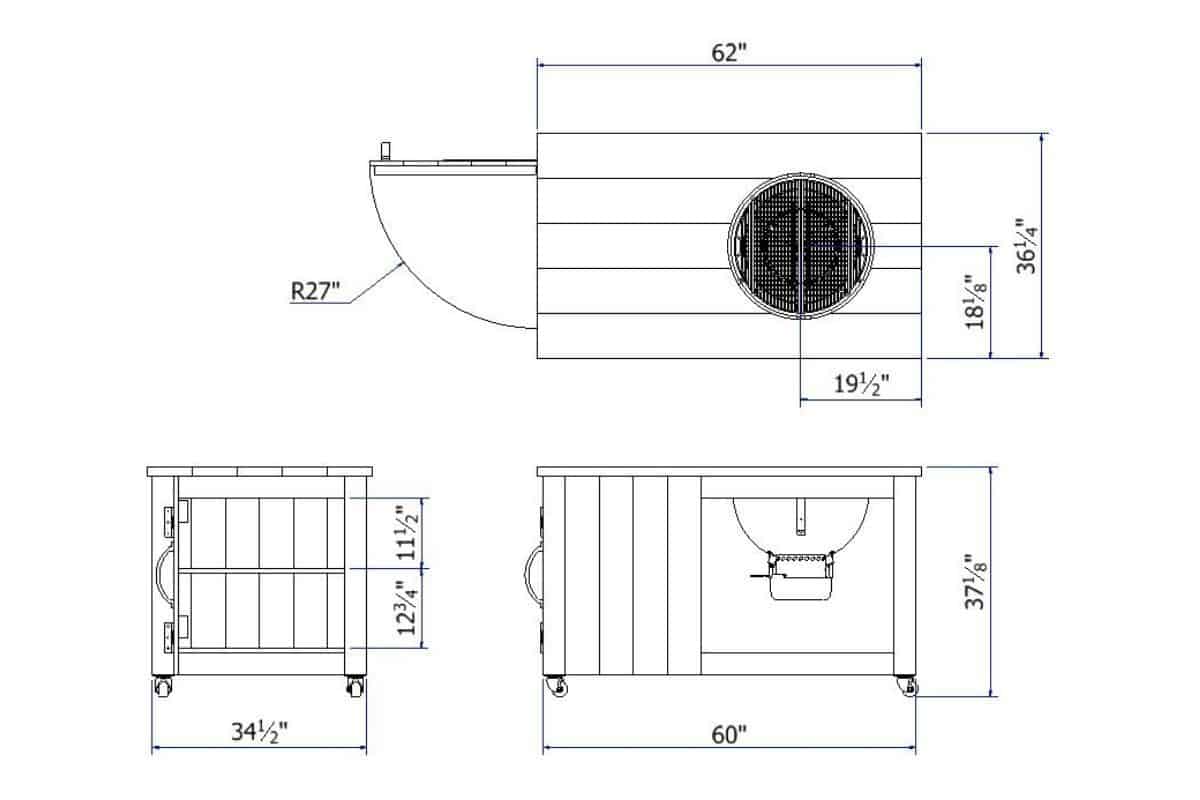
The following steps detail the construction method for this 22” kettle grill cart. Each step has drawn plans to help you visualize construction, with clear measurements to the position of each member.
Step 1: Assembling the Grill Cart Frame
The first step, of course, is to assemble the grill cart frame. I recommend reading through the other steps carefully first to ensure you have a good idea of the construction method.
I’ve built the frame from 4×4 uprights in the corners and 2×4 cross members. I chose pocket screws for the frame because they’re easy to use and produce a sturdy joint.
Also, they leave everything looking clean because the fixings are hidden. For more information, check out this video on pocket joinery.
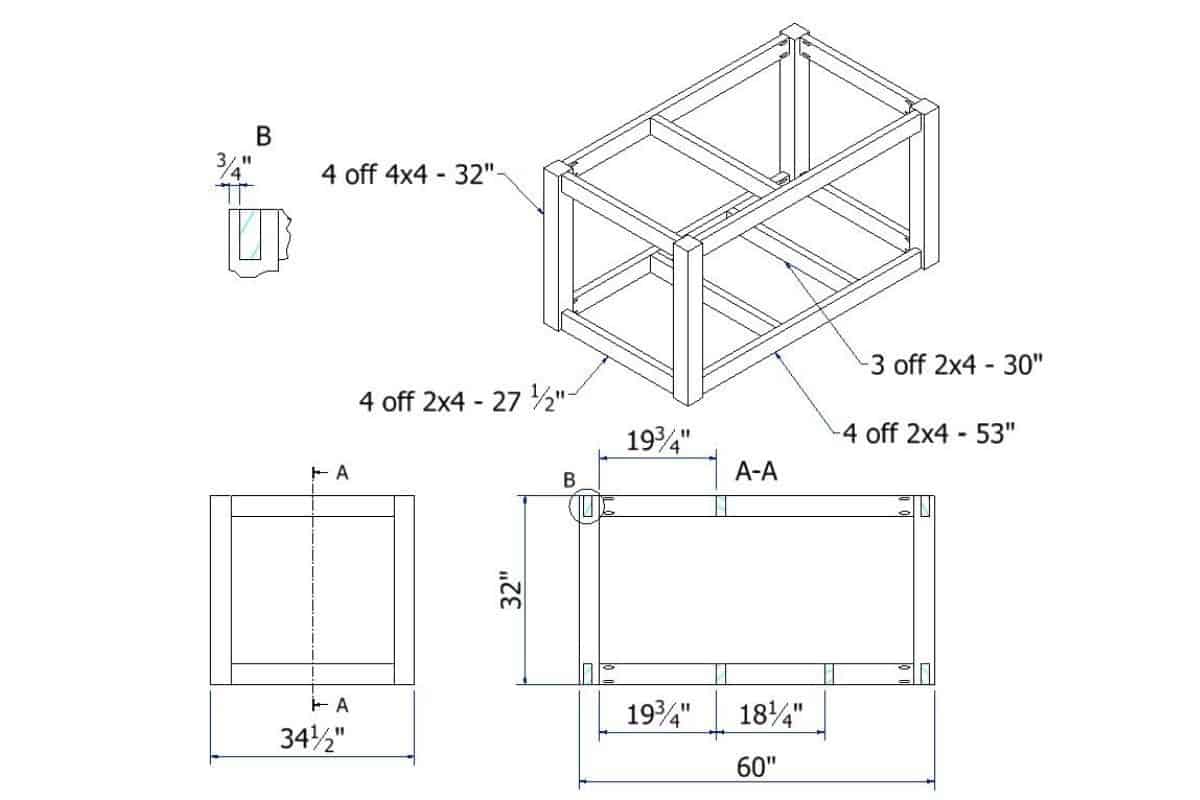
Begin by cutting the lumber for the frame:
- 4 off 2×4 – 27.5” long.
- 4 off 2×4 – 53” long.
- 4 off 4×4 – 32” long.
- 3 off 2×4 – 30” long.
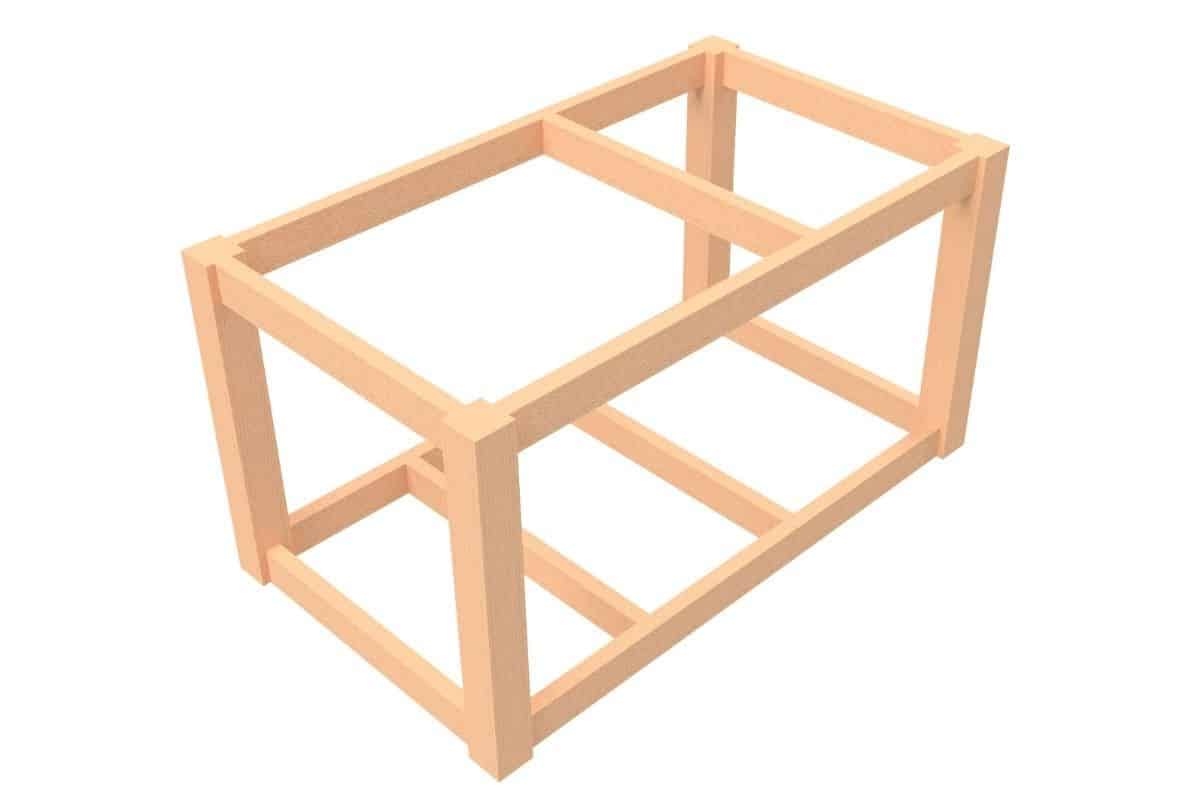
After cutting the lumber, start by assembling the outer frame. Use corner clamps to keep everything square and in position, (in keeping with this being a DIY project, you could even make your own corner clamps!)
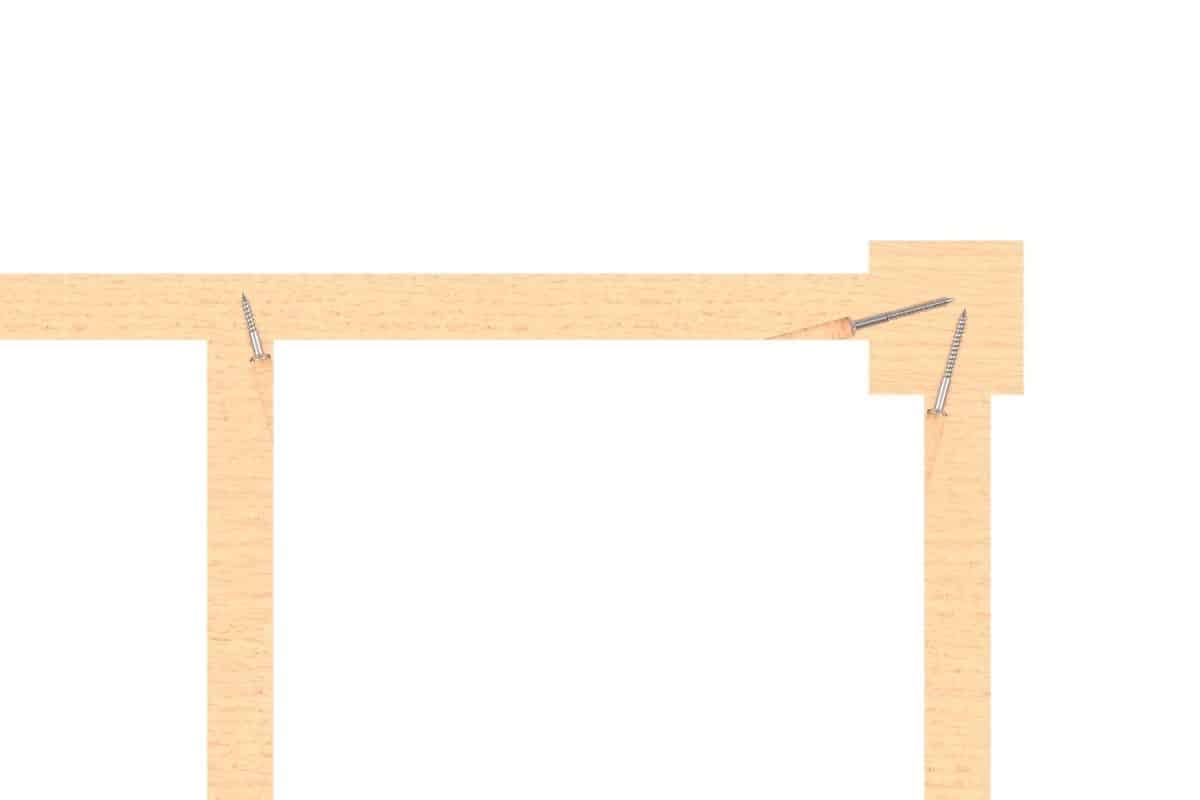
In total, there are 16 places where a piece of 2×4 is attached to a 4×4. Ensure the 2×4 is flush with either the top or bottom and set back 0.75” from the outside of the frame.
Drill 2 pocket holes for each join using your pocket jig. Secure the lumber in place using 2.5” timber screws.
Once you’ve built the outer frame, secure the inner cross members in place. As shown in the diagram, these should be positioned according to the dimensions in the drawing. Use pocket holes again, but 1.5” timber screws this time.
Step 2: Building the Storage Cupboard
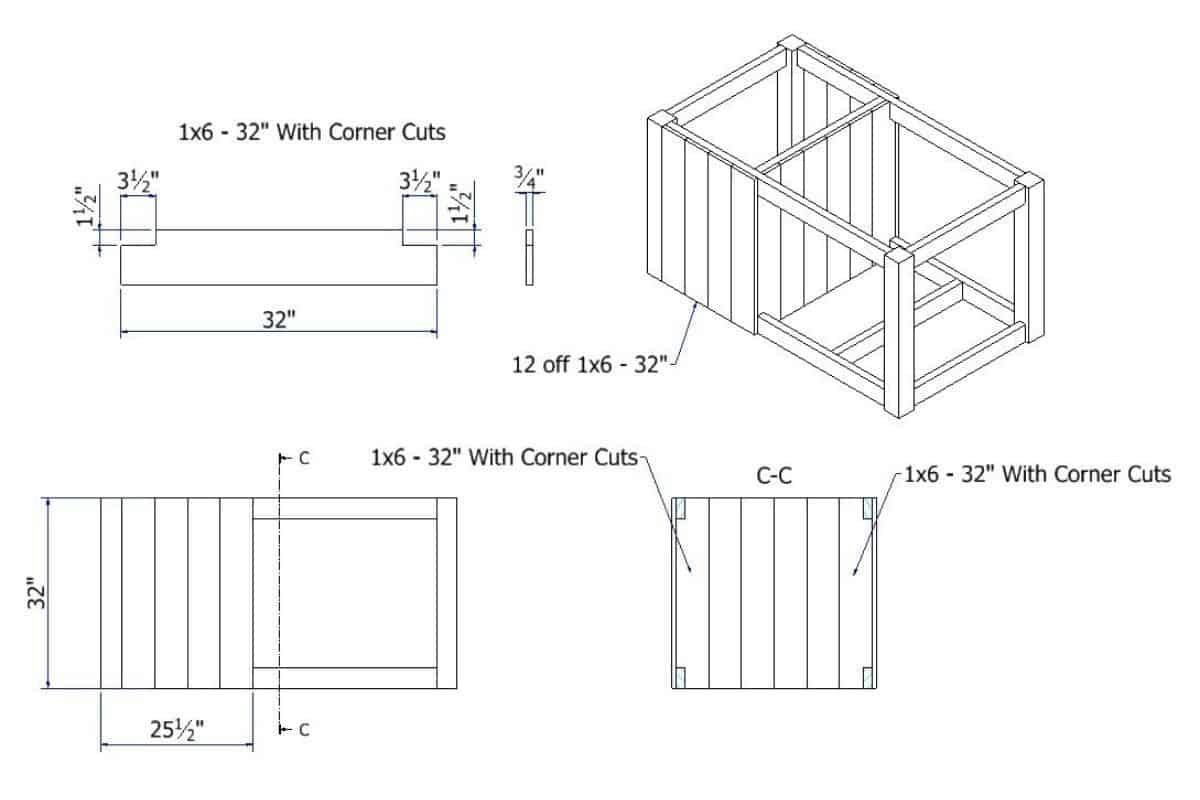
Now that you have the main frame, it’s time to start building the storage cupboard. It’s made from 14 pieces of 1×6 cut 32” long. On the 2 boards that will sit on the outer edges, cut the corners so they fit around the cross members.
Cut the 14 pieces using your power saw and then cut the corners out of 2, as shown in the diagram.
Next, fix the boards in place, starting on one side and working across the frame. A finishing nailer is ideal for this job; use 2 nails at the top and bottom of each board.
But if you don’t have a finishing nailer, use 1.5” timber screws. It’ll take longer but will be just as secure.
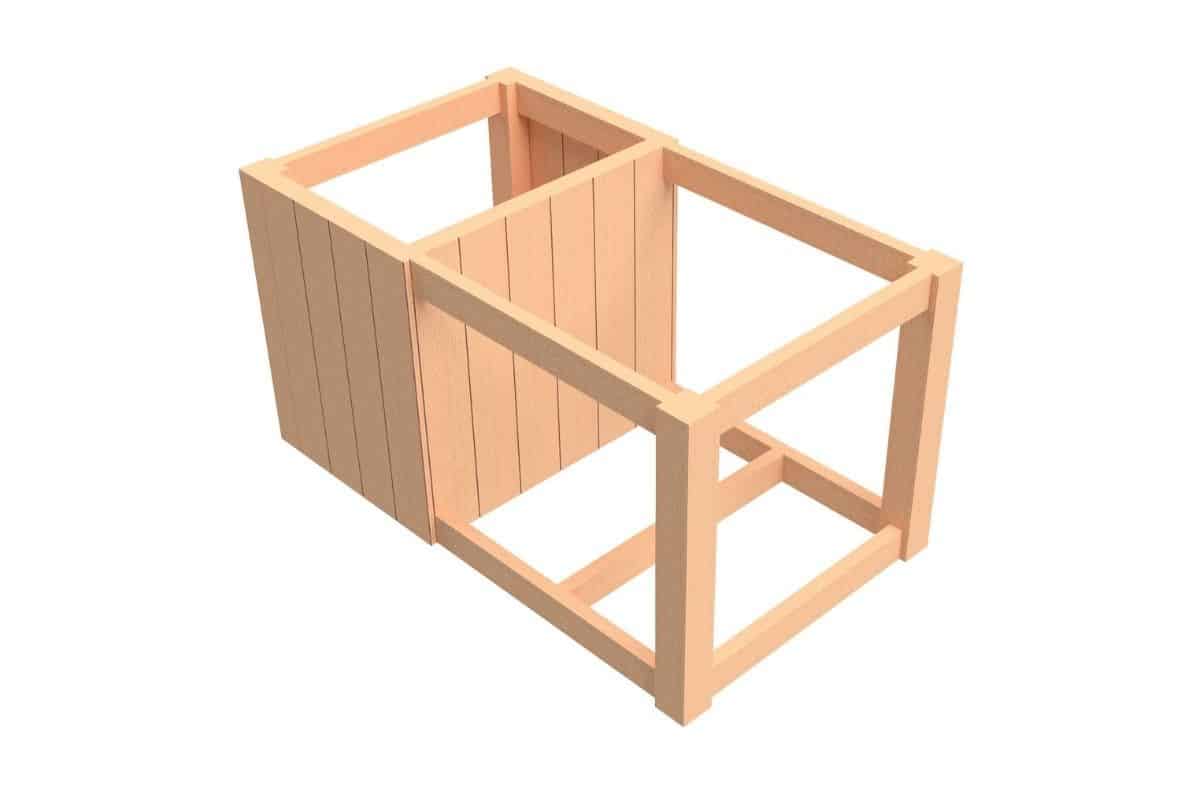
Step 3: Building the Cupboard Door and Shelves
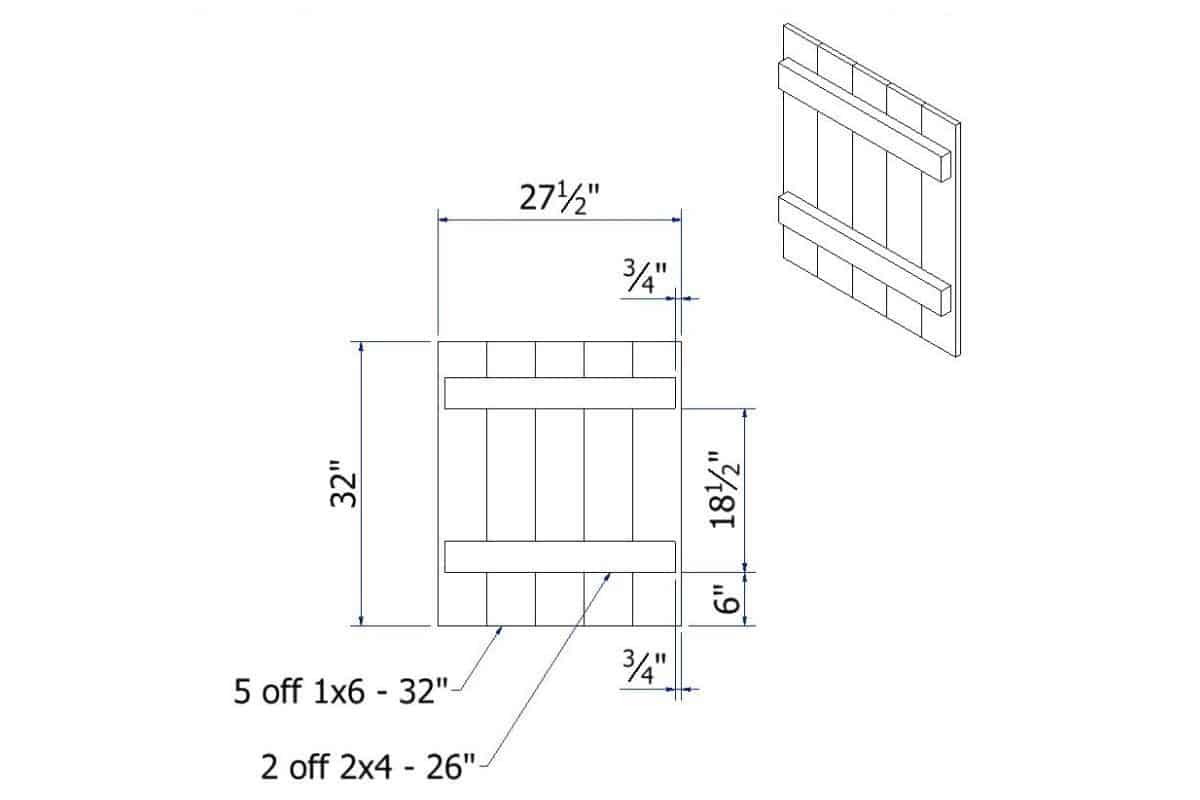
Building the door and shelves for the cupboard is fairly straightforward. The door is made from 5 pieces of 1×6, cut into 32” lengths, and 2 pieces of 2×4 cut 26” long.
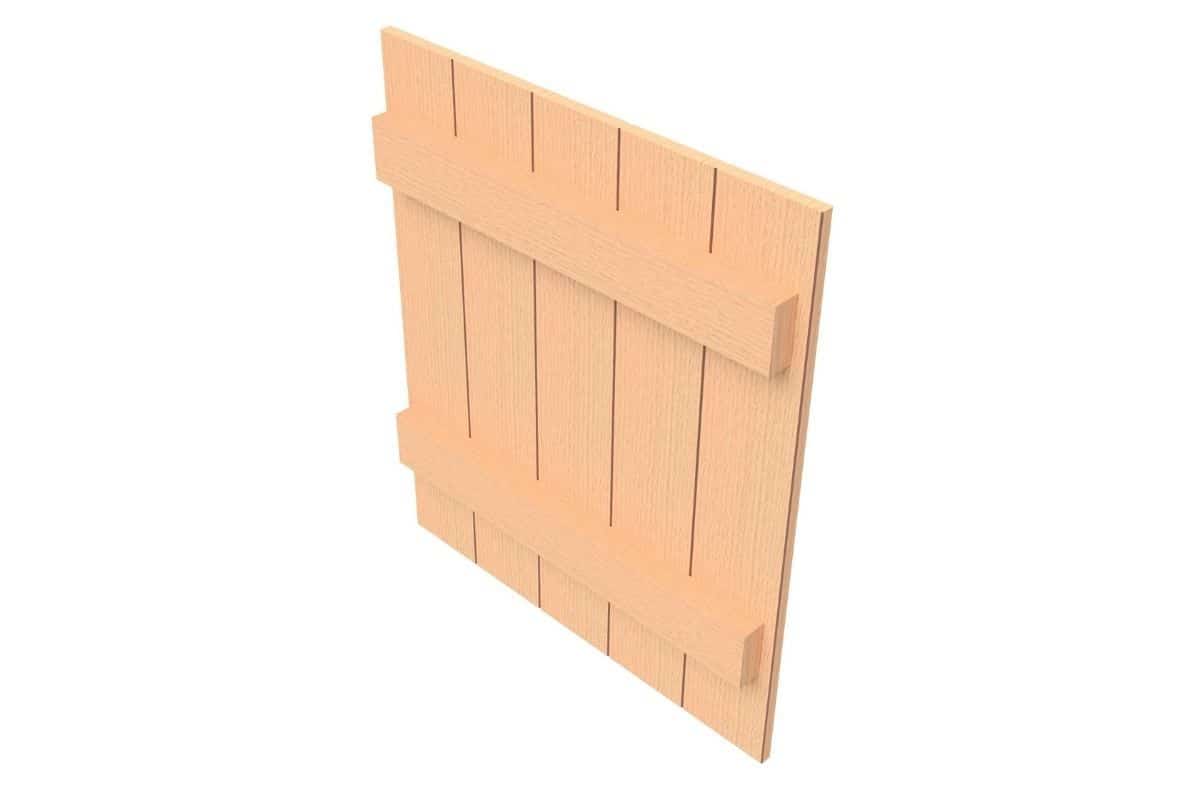
Cut the lumber to size with your power saw and follow the diagram for assembly. It’s best to use either finishing nails or 1.5” timber screws. Put the door to one side for now.
Next up is the shelves:
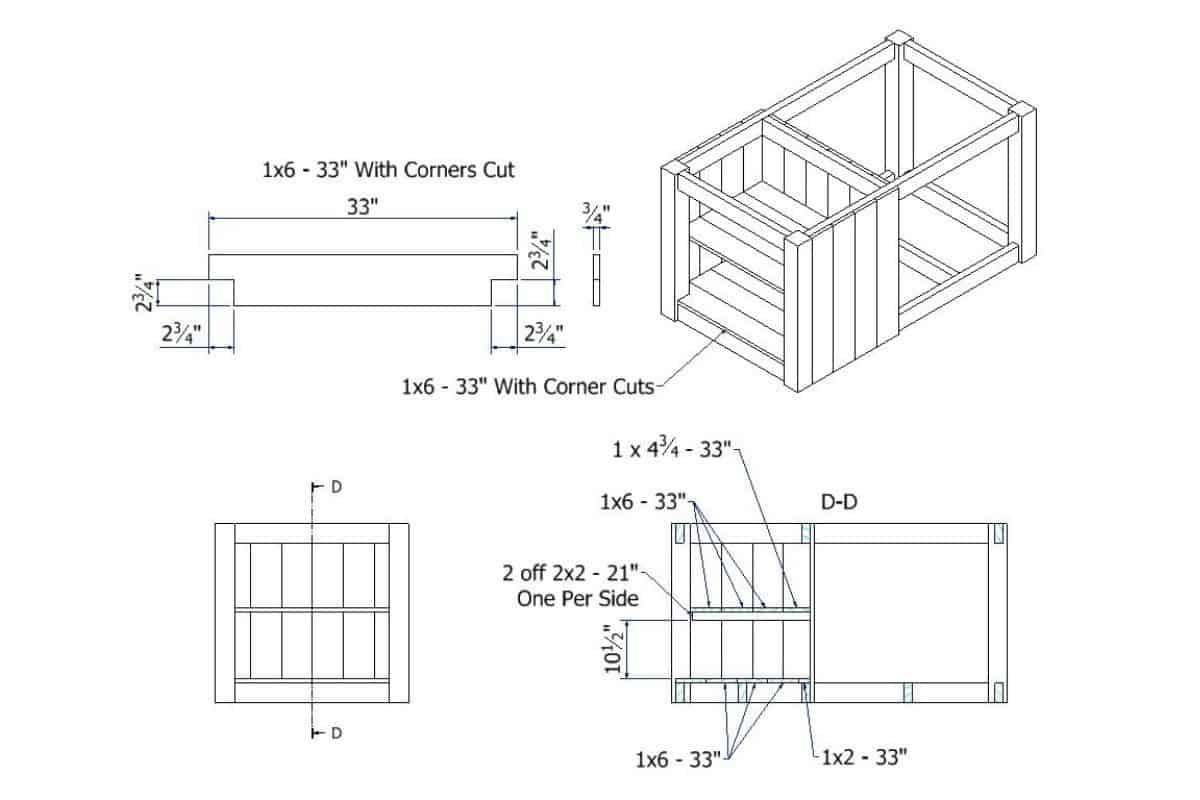
Begin with the bottom shelf. Cut 5 pieces of 1×6 to 33” lengths. One piece will need to be cut along the length so it’s 2” wide. I’d recommend doing this with either a table saw or circular saw so your cut is straight.
Also, one piece will need the corners cut out, as we did with the frame earlier. The dimensions are given in the diagram for this step. After making all the cuts, screw the lumber to the cross members using 1.5” timber screws. Alternatively, use finishing nails.
The top shelf needs 2 pieces of 2×2, cut into 21” lengths. Fix them inside the cupboard 10.5” above the bottom shelf using 1.5” timber screws. Of course, use a spirit level to ensure your shelf isn’t wonky.
For the actual shelf, cut 4 pieces of 1×6 into 33” lengths. One piece will need to be cut down to 4.75” so it fits. Screw each piece onto the 2×2 supports you just fitted.

Hanging the door is pretty simple. Use shed hinges, and be sure to screw them into the 2x4s on the door for maximum support. Fit the handle on the door, and ensure the door is hung the right way up.
The door needs to be snug in the frame, but don’t be afraid to shave it down in areas with sandpaper if needed.

Step 4: Adding the Worktop
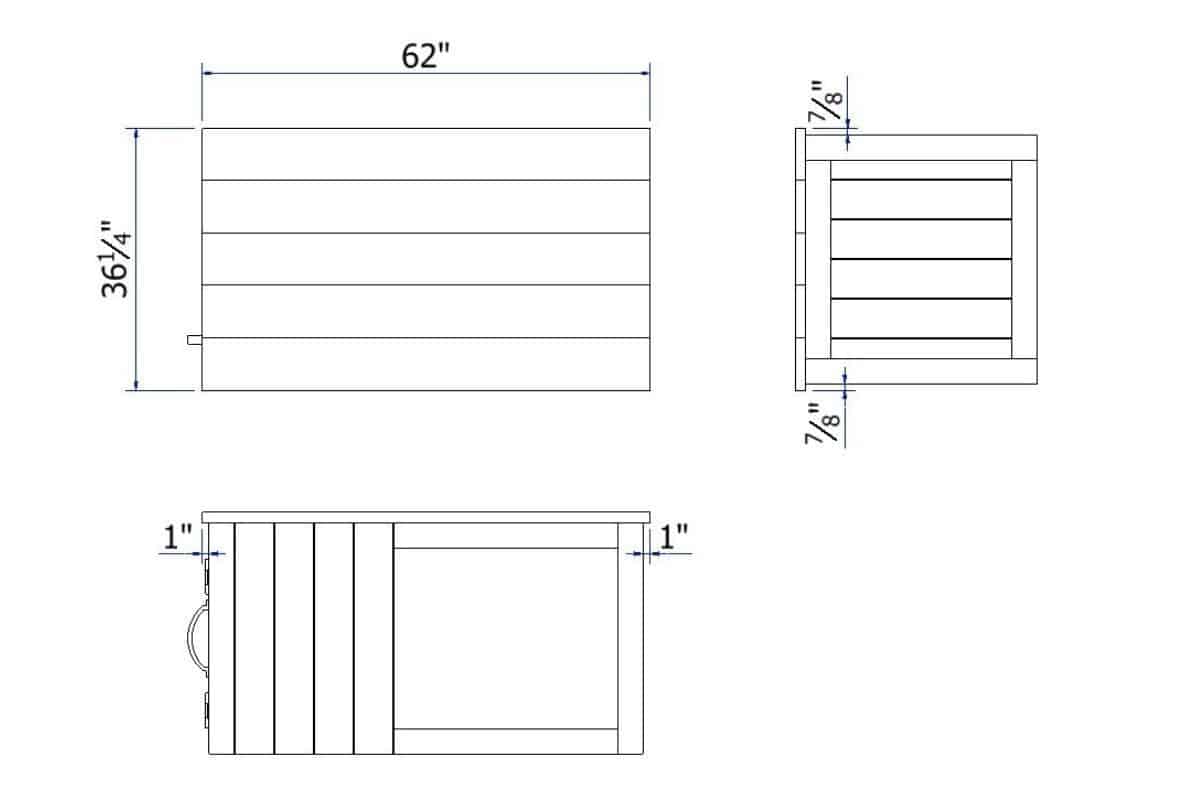
The final major step in construction is fitting the worktop. Luckily this step is really quite easy.
Cut 5 pieces of 2×8 into 62” lengths. You’ll obviously need to cut a hole for the kettle grill, but that’s easiest once you’ve built the worktop.
Start with one of the edge pieces, making sure it overhangs by 1” on each end and 7/8” on the side. Use clamps to secure it, and screw in place with 2.5” timber screws.
Line up the next board at both ends and secure in place with a clamp. You don’t want any gaps between boards, but providing your wood is straight you shouldn’t need to clamp them across the width.
Screw the second board in place and repeat with the remaining pieces of lumber.
Next is marking out the hole for the kettle grill.
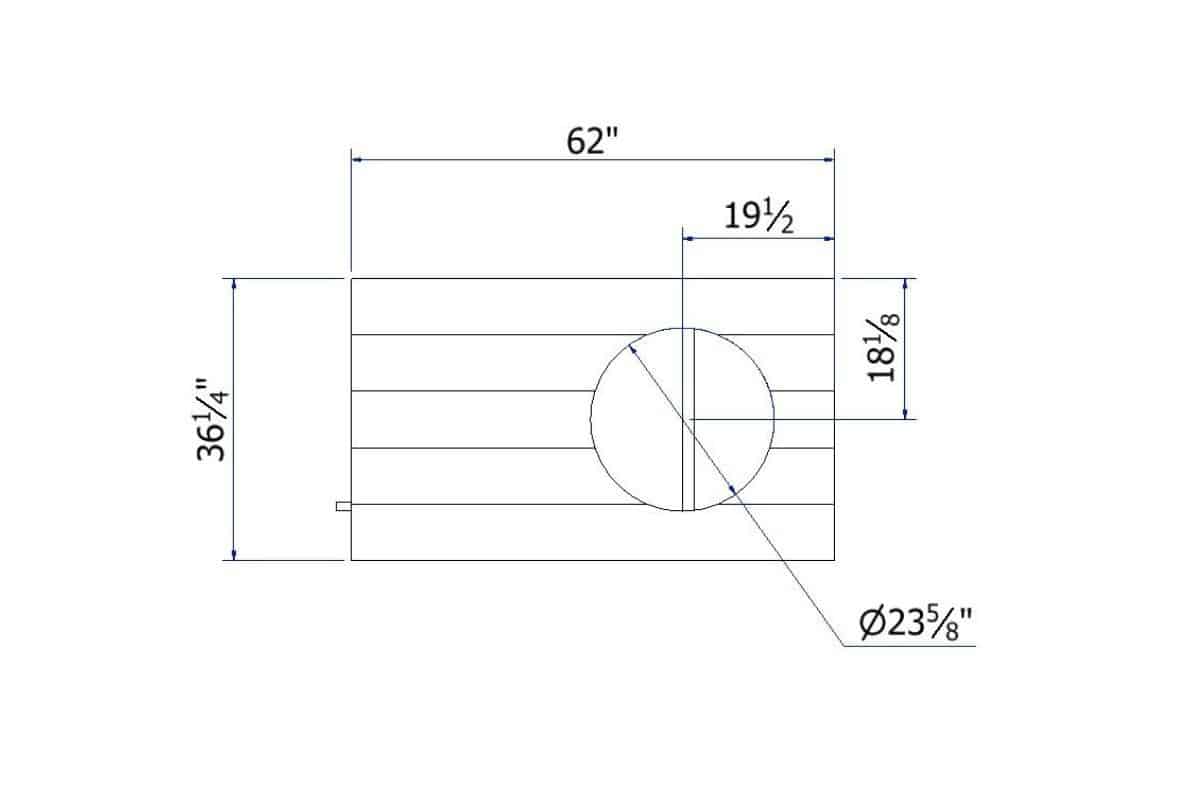
On the opposite side to the cupboard, mark a point 19.5” in from the edge and 18.5” from the side. Draw a circle, 23 5/8” in diameter, using your mark as the center point.
If you have a compass big enough, great. If not, I recommend using a piece of string with a nail on one end and a pencil on the other. Lightly hammer the nail into the center mark and use it as a compass.
After drawing the circle, cut it out using a jigsaw. Drill a hole inside the circle close to the edge. Follow the line as closely as possible (always remaining inside) and tidy up with sandpaper.
Step 5: Finishing with the Grill
Before going any further, fit the caster wheels. Tip the cart onto one side and screw a wheel into each upright. I recommend using 2.5” timber screws for security.
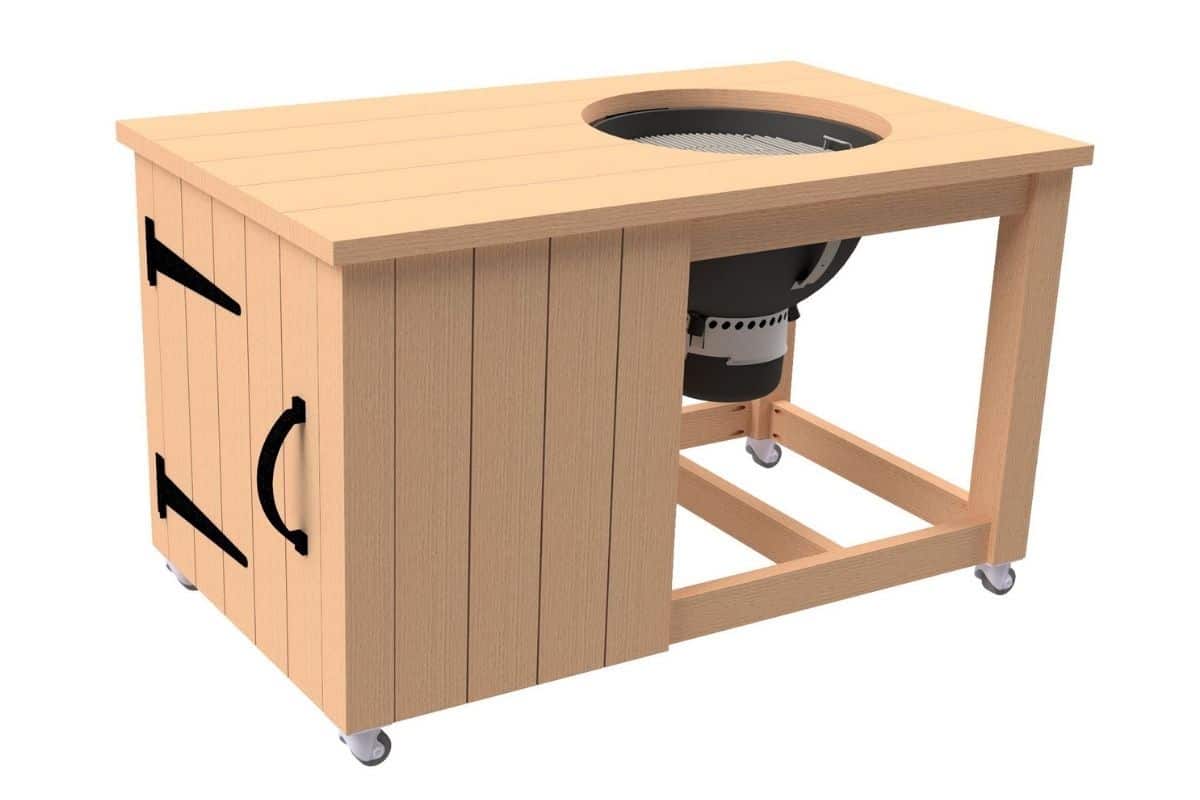
Fitting the grill is basically just as simple. Get some kettle table mounting brackets and screw them into the grill and worktop. There isn’t a set height for mounting your kettle grill; do whatever feels best for you.
It’s worth mentioning that this step will void the warranty on your grill. If you don’t mind, go ahead. But you might want to pick up a secondhand grill instead just to be on the safe side.
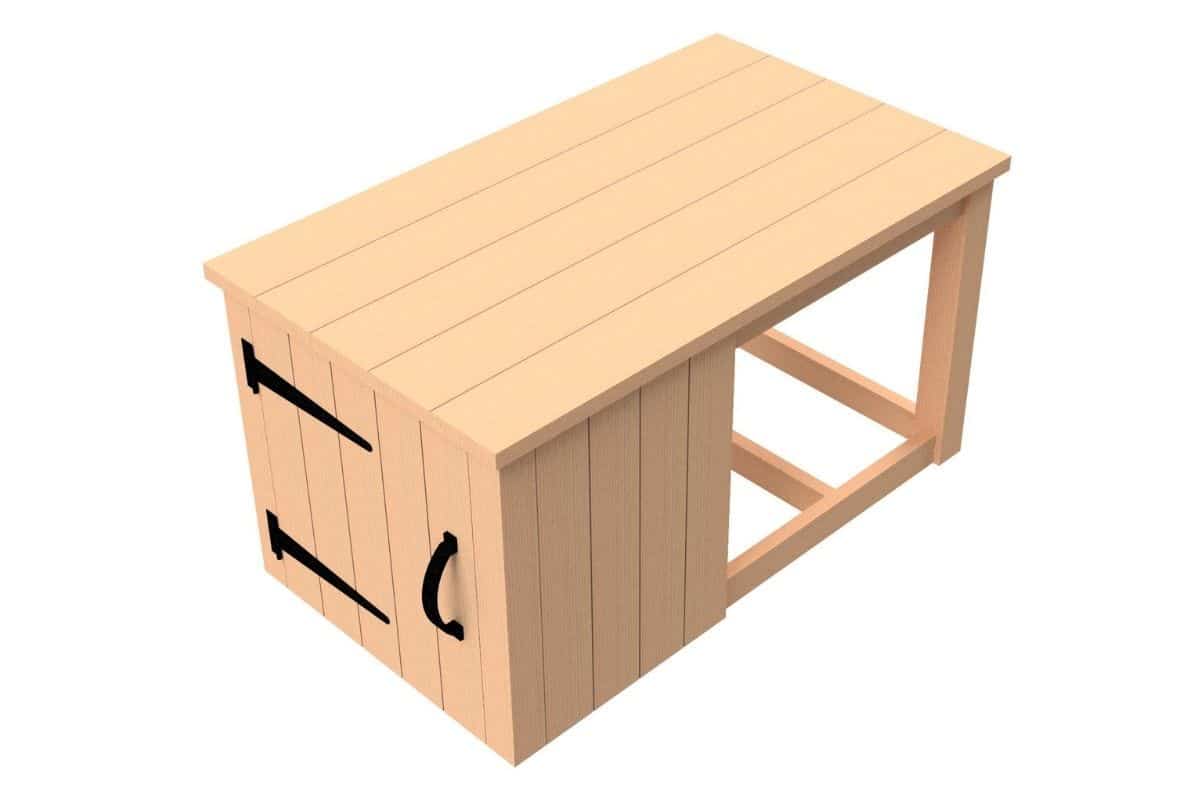
Some Final Thoughts
Hopefully this guide has given you some detailed information on how to build a 22” kettle grill cart.
I’m highly satisfied with the versatility this has added to an already useful product. The storage cupboard is ideal for briquettes, wood, and grilling tools. Of course, the worktop speaks for itself.
Did you find this guide useful? Let me know in the comments below. As always, I welcome any feedback or tips you might have for making these grill cart plans even better.


Hi. Thanks for the build guide. What do you mean “off” in the cut list. Is this a supposed to mean of?
It’s a common way to describe a quantity of parts, using ‘off’. never understood why, but I just go with it, lol.